
To see the detailed statistics page of each sent newsletter, you must have:
- the MailPoet Premium plugin installed and activated;
- the “Engagement analytics tracking” enabled and set to “full” in MailPoet > Settings > Advanced tab.
To access these stats, you should click on the “Statistics” link or the numbers for overall opened/clicked rates on the Emails page.

Want to understand how are opened and clicked rates calculated? Read more about it here.
Understanding Your Engagement – What Your Metrics Mean
In the summary statistics of your email campaigns, you will come across two important rates that gauge the performance of your email marketing efforts: the click rates and the open rates.
These rates are critical indicators of how well your audience is engaging with your content. Understanding them helps in crafting effective future campaigns.
Click Rates
The click rate, which appears at the top, measures the percentage of recipients who clicked on one or more links contained within your email. This metric is pivotal as it directly reflects the level of interaction or action taken by your audience in response to your email content.
Your click rate will have a color-coded indicator next to it showing how well this email did. You can hover over this marker to see more detail.
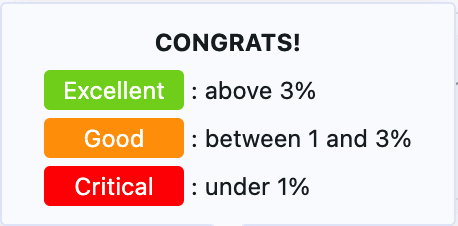
Excellent (Above 3%): This indicates a high level of engagement from your audience. Your content is resonating well, driving a significant number of recipients to take action by clicking on links within your email. Strategies in place are working excellently; consider analyzing what’s driving this success for future campaigns.
Good (Between 1% and 3%): Your emails are achieving a reasonable level of engagement. There’s room for improvement by experimenting with different call-to-actions or content types to see if click rates can be increased.
Critical (Under 1%): This is a sign that your audience is not engaging with your email content as expected. It’s crucial to review your email content, design, and recipient targeting to identify areas for improvement.
Open Rates
Below the click rates, you will find the open rates, which indicate the percentage of recipients who have opened your email. This rate is significant because it’s a preliminary step before any action, such as clicking, can take place. It provides a sense of how well your subject line and sender reputation are performing in terms of compelling recipients to initially engage with your email.
Your open rate will have a color-coded indicator next to it showing how well this email did. You can hover over this marker to see more detail.
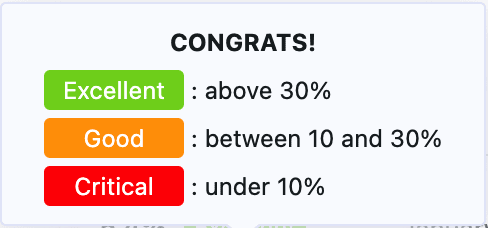
Excellent (Above 30%): Indicates that your emails are very effective in catching your audience’s attention. High open rates often correlate with compelling subject lines and strong sender reputation.
Good (Between 10% and 30%): Shows moderate success in your email campaigns. While your emails are being opened, there’s potential to optimize subject lines or sending times to boost this metric.
Critical (Under 10%): Reflects a need for immediate attention. Low open rates suggest your emails are not compelling enough to open or are potentially being marked as spam. Revisiting subject lines, sender information, and ensuring your list is clean and updated are crucial steps.
Note: subscribers who opt out of tracking still count as sent, but their opens and clicks are not recorded, so your open and click rates may appear lower. Past recorded activity is not removed.. To learn more, read How to let subscribers opt out of email open and click tracking.
Detailed Statistics page
After clicking on “Statistics” on the pop-out menu below a newsletter, or clicking on the clicked/opened numbers in the statistics column, the detailed statistics page will open (if you have the premium plugin installed with a paid MailPoet plan).
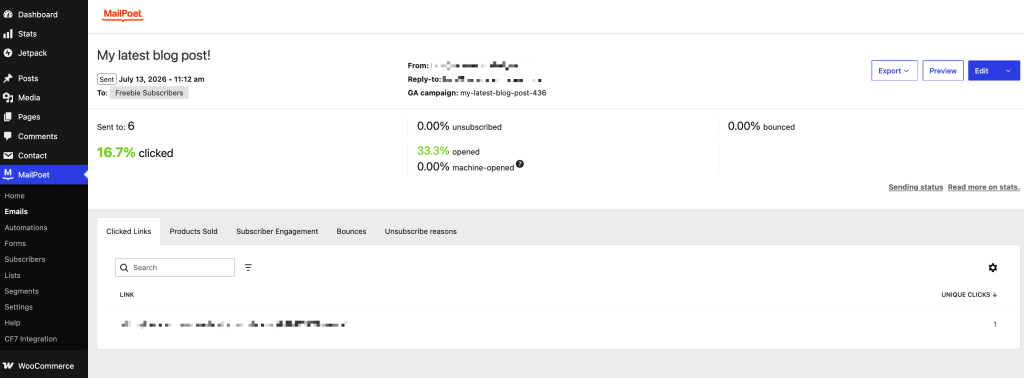
On this page, you’ll see statistics about each sent newsletter:
- total number of subscribers the email was sent to, and to which lists it was sent to;
- opened, machine-opened, clicked, unsubscribed, and bounced rates;
- note: “opened” represents emails opened by a human; for the overall open rate, “opened” and “machine-opened” should be added together
- you can show opened + machine as a combined value by going to MailPoet > Settings > Advanced, and setting the parameter “Human and machine opens” to “Merged)
- which email address was used as the From and Reply-to;
- Export button to export either full recipient data, or just summary data, as a CSV or XLSX file;
- Preview in browser button;
- Edit button -> click here to view the original layout, use the down arrow at the right edge of the button to duplicate, trash, or re-send this email to those who did not open it;
- date and time the newsletter was sent;
- Google Analytics campaign name;
- Full details on which links were clicked, which subscribers have interacted with this email, and what sales were generated (if you have WooCommerce).
Statistics Tabs
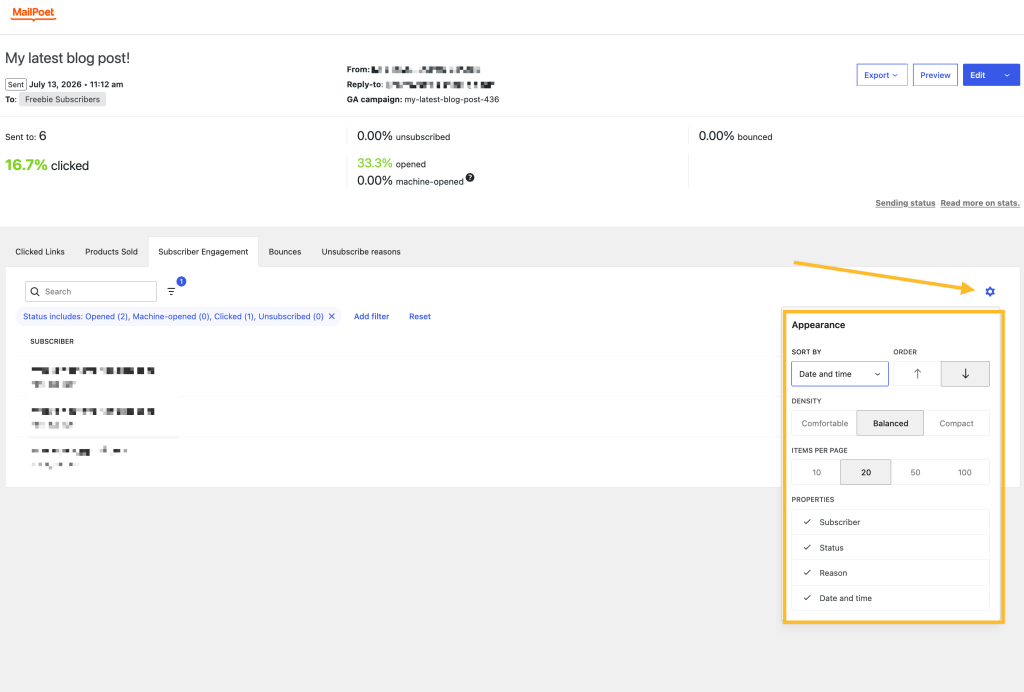
For all tabs, you can use the settings gear icon in the upper right to change the date, sort, and layout options for the data shown.
Clicked Links Tab
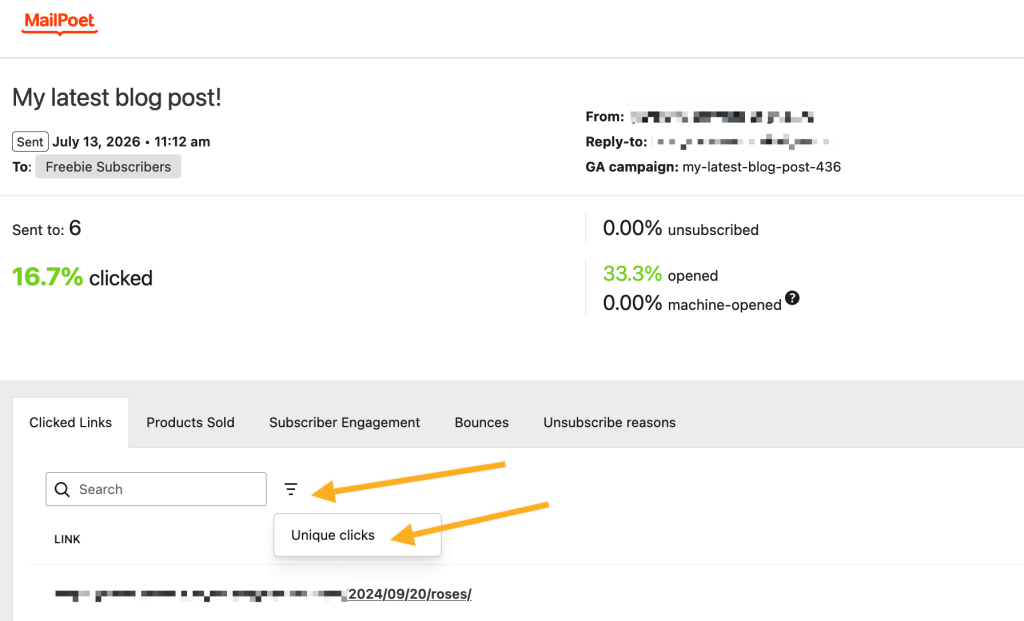
In the Clicked Links tab, the number of unique clicks is displayed for each link of your newsletter.
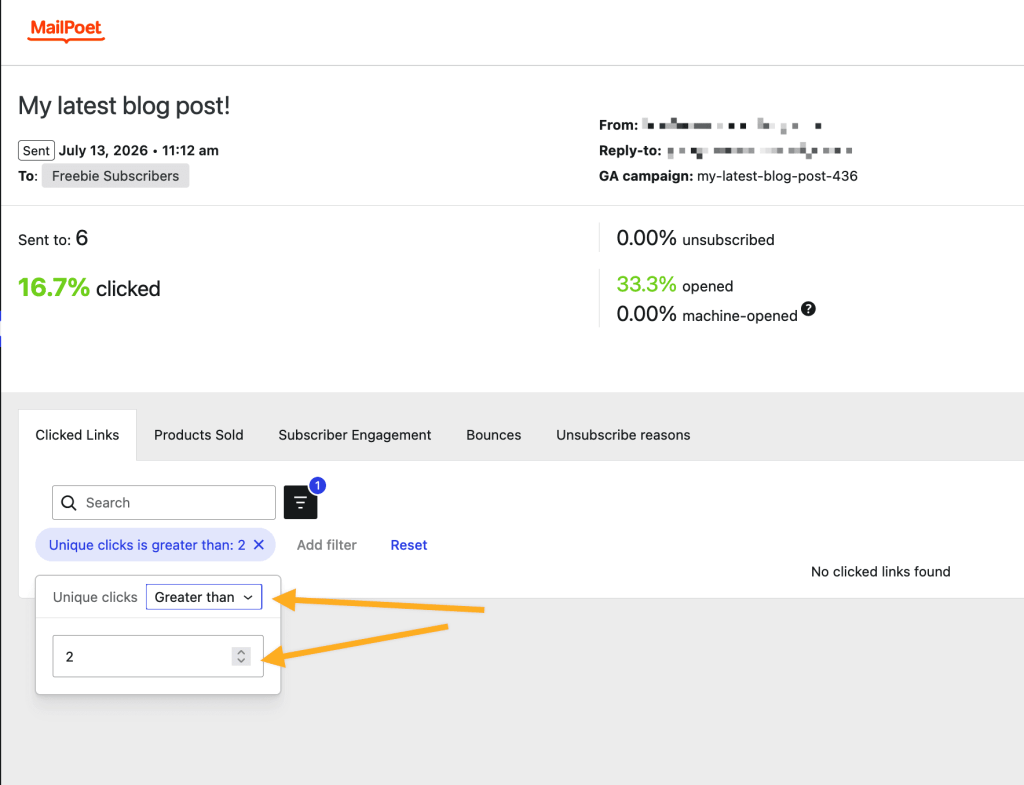
You can filter this list by clicking the Filter icon next to the search box. This is a two-step process:
- first, click the filter icon and select “Unique Links”
- then, indicate which types of links you wish to filter for
Products Sold Tab
This tab will show a list of all products that were sold as a direct result of clicking through the links in this newsletter, following a link from email -> product -> cart -> checkout.
Subscriber Engagement Tab
In the Subscriber Engagement tab, you’ll see who clicked, opened, unsubscribed or unopened your newsletter.
This tab loads with a filter in place by default. This default filter restricts the list to subscribers who opened the email, clicked on a link, or unsubscribed.
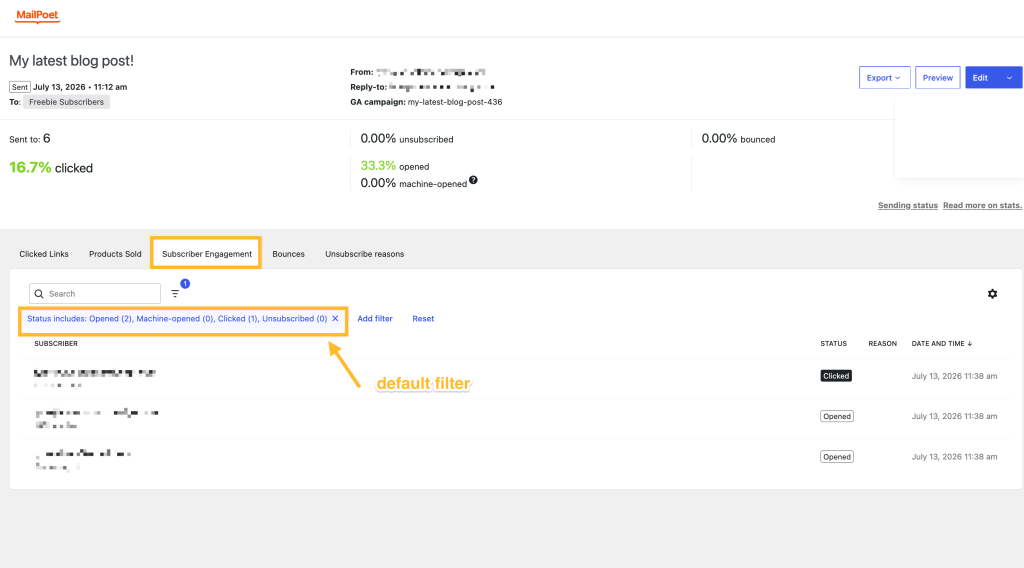
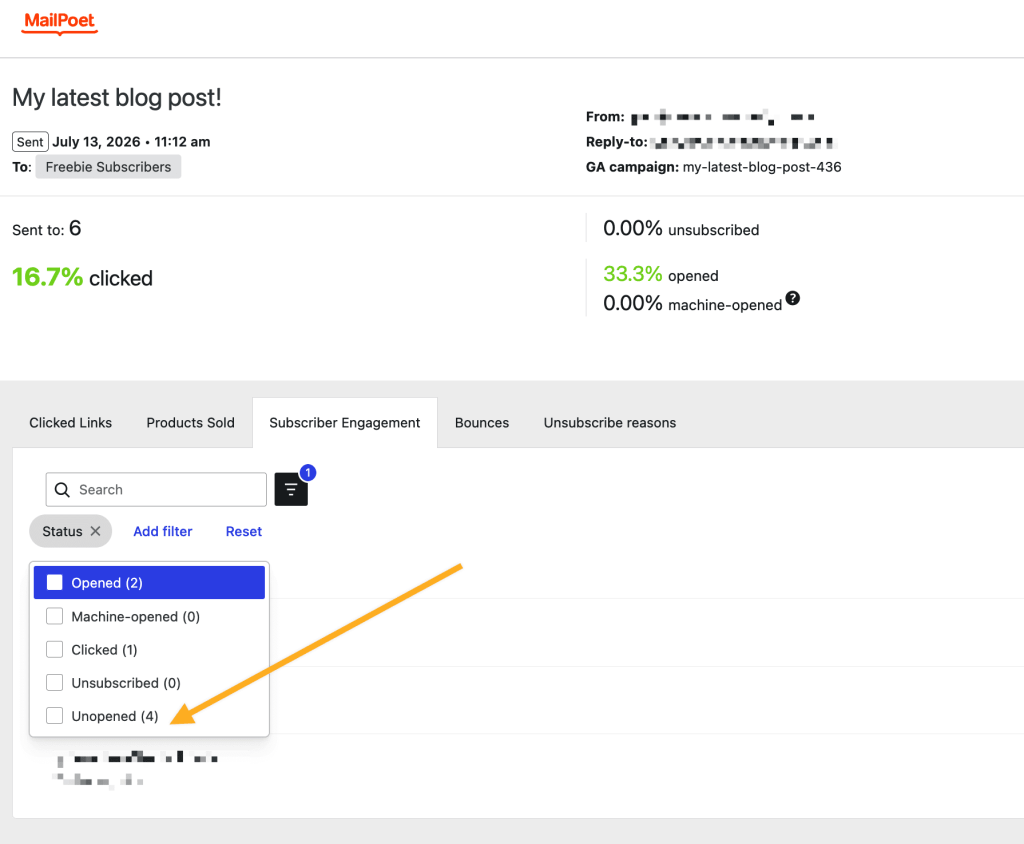
You can use the “x” on this filter to remove it. You can then add new filters using the filter icon next to the search bar:
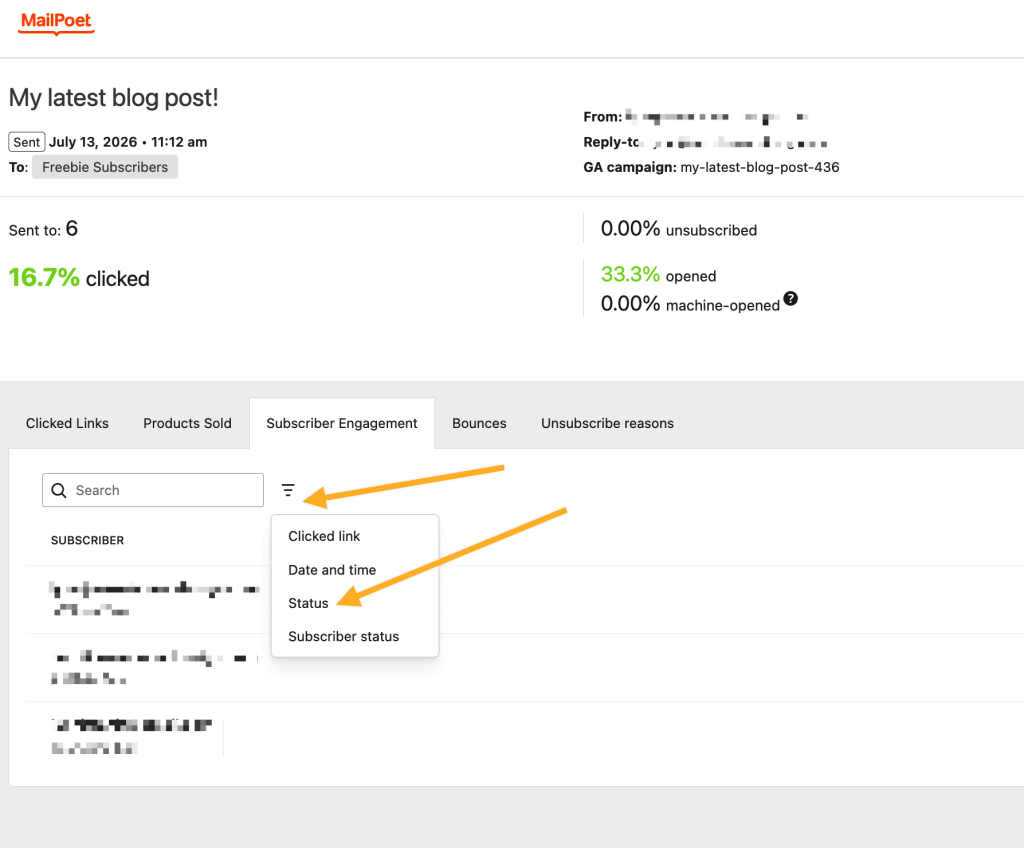
In particular, if you wish to see a list of all subscribers who did NOT open this email (i.e. subscribers in Unopened status), then click “Status” under the filters, then complete the second step of choosing Unopened from the Status options box.
Bounces Tab
This will list all subscriber email addresses that either:
- bounced for a permanent reason (for example, email address / domain no longer exists)
- marked your email as spam
Note that subscribers who have been marked as Bounced will be moved to Bounced status overall. These subscribers will not receive your future emails. More on how to restore or remove bounced subscribers here.
Unsubscribed Reasons Tab
If the subscriber has provided a reason for unsubscribing, these will be listed here, with total numbers for each.
You must be logged in to post a comment.